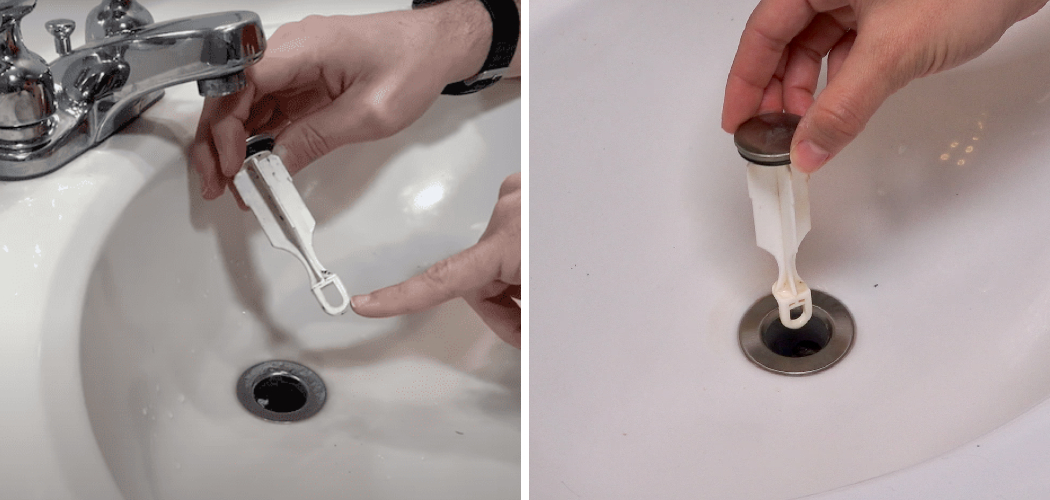
Are you tired of dealing with a clogged bathroom sink drain? how to remove a bathroom sink drain plug is the first step in solving this common problem. Fortunately, it is a relatively simple process that you can do yourself without needing any special tools or equipment.
Maintaining a clean and functional bathroom sink requires occasional upkeep, including removing the drain plug. Whether dealing with a clog, performing routine cleaning, or replacing the drain plug, knowing how to remove it is a valuable skill.
This guide will walk you through the process step-by-step, ensuring a smooth and hassle-free experience. You can keep your sink in top working condition with just a few tools and some basic knowledge.
What Will You Need?
Before we dive into removing a bathroom sink drain plug, let’s ensure you have all the necessary tools and materials. Here’s what you’ll need:
- A pair of pliers
- A flathead screwdriver
- A bucket or container to catch any water that may spill out
- Cleaning solution (optional)
That’s it! These are all common household items that you likely already have on hand. Now, let’s get started.
10 Easy Steps on How to Remove a Bathroom Sink Drain Plug
Step 1: Clear the Area
Before you begin, it’s essential to ensure the workspace is clean and free of any items that might get in the way. Remove personal items, such as toothbrushes, soap dispensers, or decorative objects from around the sink area. This will give you ample work space and prevent accidental spills or breakage. Additionally, it’s a good idea to lay down a towel or old cloth under the sink to catch any water drips and protect your cabinetry. Place your tools within arm’s reach to streamline the process and avoid interruptions. A clean, organized workspace sets the stage for a smooth drain plug removal.
Step 2: Turn off the Water Supply
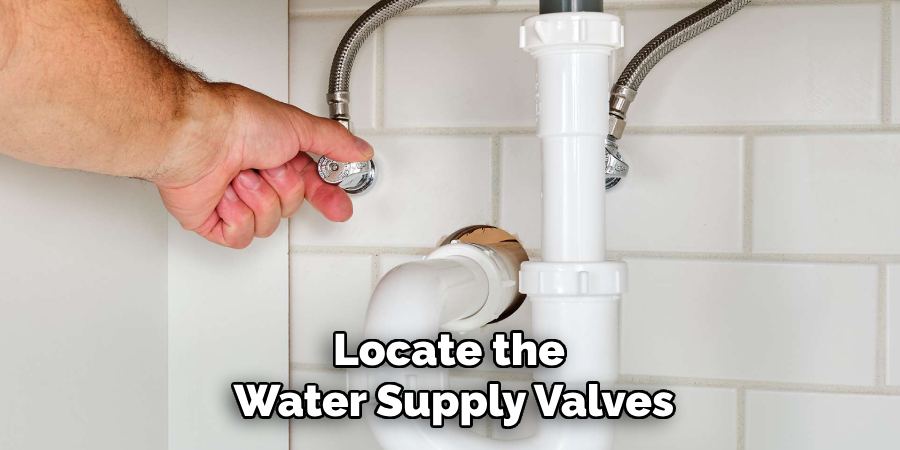
Locate the water supply valves under the sink and turn them off. This is a crucial step to prevent accidental water flow during plug removal. Turn the valves clockwise until they are fully closed. If your sink doesn’t have individual shut-off valves, you may need to turn off the main water supply for your house. Once the water supply is turned off, turn the faucet to release any remaining water in the pipes. This will help to minimize any mess and make the process smoother.
Step 3: Remove the Stopper
To begin, you must remove the sink stopper. Locate the lift rod behind the faucet, which is connected to the stopper mechanism. Gently pull the lift rod up and down to test the stopper’s movement. Depending on your sink design, you may need to twist the stopper counterclockwise or pull it straight up and out of the drain.
Step 4: Disconnect the Pivot Rod
Underneath the sink, you’ll find the pivot rod connected to the drainpipe. A small clip or nut usually secures the pivot rod. Use your pliers or hands to disconnect the rod from the drainpipe. Once disconnected, gently pull the pivot rod out from the drain assembly. This should release the stopper if it still needs to be removed.
Step 5: Unscrew the Drain Flange
Using your pliers or flathead screwdriver, locate the nut that secures the drain flange to the sink. This nut is situated underneath the basin. Carefully unscrew the nut and set it aside. Once the nut is removed, you should be able to lift the drain flange from the top of the sink. Take caution to keep any washers or gaskets that may come loose during this process, as you may need them for reassembly.
Step 6: Clean the Drain
With the drain plug and flange removed, it’s ideal to clean the drain thoroughly. Use a cleaning solution or a mixture of vinegar and baking soda to clear any debris, buildup, or grime. Let the solution sit for a few minutes before rinsing with warm water. A clean drain not only functions better but also helps prevent future clogs.
Step 7: Replace the Drain Flange
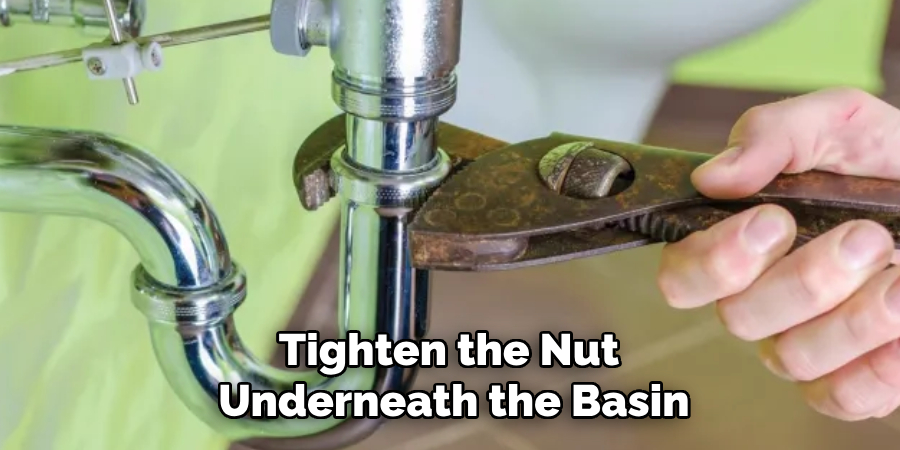
If you removed the drain flange earlier, now is the time to clean or replace it. Properly position the flange back into the sink hole, ensuring that any washers or gaskets are correctly aligned. Tighten the nut underneath the basin to secure the flange. Hand-tighten first, then use your pliers to give it an additional snug without over-tightening, which could break the flange or sink.
Step 8: Reconnect the Pivot Rod
Reinsert the pivot rod back into the drainpipe and align it with the stopper mechanism inside the sink. Once correctly positioned, reattach the clip or nut to secure the pivot rod. Test the functionality of the stopper by moving the lift rod up and down to ensure it operates smoothly.
Step 9: Turn the Water Supply Back On
Now that the drain assembly has been reassembled turn the water supply valves back on. Turn them counterclockwise to open. If you have turned off the main water supply, ensure it is also turned back on. Once the water supply is restored, turn on the faucet and check for leaks around the drain area.
Step 10: Final Test and Clean-Up
Finally, test the sink by filling it with water and releasing the stopper to ensure everything functions correctly. Check for any leaks and make any necessary adjustments. Once you are satisfied that everything is working correctly, clean your workspace, remove any towels or clothes, and return personal items to their original places.

Following these simple steps can easily remove a bathroom sink drain plug. Always be cautious and gentle when handling parts to prevent damage.
5 Additional Tips and Tricks
- Use a Hairdryer: Warm the metal parts of the drain plug with a hairdryer for a few minutes. The heat can sometimes loosen the seal, making it easier to remove.
- Vinegar and Baking Soda: Pour a vinegar and baking soda mixture down the drain. This helps break down any build-up that might be causing the plug to stick.
- Rubber Gloves: Wearing rubber gloves can provide a better grip on the drain plug, especially if it’s slippery or greasy.
- Plunger: Use a small plunger to create suction around the drain plug. The force of the plunger can often help dislodge it.
- Check the Pivot Rod: Ensure the pivot rod connected to the drain plug is free to move. Sometimes, adjusting the pivot rod can release the tension on the plug, allowing it to be removed more easily.
With these additional tips and tricks, you can remove a stubborn drain plug. Remember always to use caution and avoid using excessive force, as this can cause damage to your plumbing system.
5 Things You Should Avoid
- Using Sharp Objects: Avoid using knives, screwdrivers, or other sharp objects to pry the drain plug. This can easily damage the sink or the plug itself.
- Ignoring Manufacturer Instructions: Remember the instructions for your specific drain plug. Different models may have unique mechanisms that require specific methods for removal.
- Excessive Force: Applying too much force can break or damage the components of your sink drain. Gentle, consistent pressure is usually more effective and safer.
- Chemicals Without Ventilation: Using strong chemicals without proper ventilation can harm your health. If you resort to chemical cleaners, always ensure the room is well-ventilated.
- Neglecting Protective Gear: Skipping protective gear such as gloves or eye protection can lead to injuries. Always use appropriate safety gear to protect yourself while working on plumbing issues.
By avoiding these common mistakes, you can prevent further damage and safely remove a stubborn drain plug.

What are the Signs of a Damaged or Faulty Drain Plug?
A few signs can indicate a damaged or faulty drain plug. These include:
- Difficulty removing the plug even after trying various methods
- Visible cracks or chips on the plug
- The plug does not fit snugly into the drain hole
- Leakage around the drain area when water is running
If you notice any of these signs, it may be time to replace your drain plug. It’s essential to address any issues with your plumbing as soon as possible to prevent further damage and potential water damage in your home.
Conclusion
In conclusion, how to remove a bathroom sink drain plug can be a straightforward process if you follow the right steps and take necessary precautions.
Start by identifying the type of drain plug you are dealing with and consult the manufacturer’s instructions if available. Utilize tools such as a hairdryer, rubber gloves, and a plunger to aid in loosening the plug. Remember, it’s crucial to avoid using excessive force or sharp objects to prevent damage to your plumbing system. With patience and careful technique, you can successfully remove even the most stubborn drain plug and ensure your sink operates smoothly. Always wear appropriate protective gear and ensure the area is well-ventilated, especially when using chemical cleaners.
By adhering to these guidelines, you can maintain both safety and efficiency in your plumbing maintenance.

